A friend introduced me to Minecraft and it was not what I expected
Recently, my quantumly confused friend, Patrick Downing aka padraignix (blog.quantumlyconfused.com), introduced me to the world of Minecraft – and it was not what I had expected.
I’ve always been aware of Minecraft; it’s hard not to be. For years, it has enjoyed massive popularity driven by its availability on all platforms. I remember going to a Halloween party where several people had dressed as Minecraft characters, pickaxes and all. I can’t forget loading Minecraft on my iPhone 3G, which blew me away at the time, but I didn’t delve too deeply into it. I downloaded it for free on my Xbox 360 and went a step further – I built a cabin and a small subsistence farm, but that was that. It was fun, creative, and interesting, and even by the time I had put it down, it was clear that Minecraft had all the qualities of a timeless game.
Some of the sheer scale and creativity of user creations in Minecraft didn’t just circulate in Minecraft circles but the wider gaming community in general, like entire city builds of Minas Tirith, modern city builds, cyberpunk-inspired city builds, recreations of ancient Rome and the Acropolis; the possibilities in Minecraft seemed endless. However, I always had this idea that it was a game about mostly digging up and placing blocks into pixel art-style buildings and landscapes.
So when padraignix showed me his nuclear reactor control panel designed in ComputerCraft for Minecraft (https://github.com/padraignix/mc-computercraft-scripts), it blew me away. You can design nuclear reactors in Minecraft, and their control / monitoring systems… wow.
With the vast potential of Minecraft and its incredible mod capabilities dawning on me for the first time, Padraignix asked if I would be interested in participating in a server with All the Mods, a modpack by ATMTeam consisting of over 400 different mods. I was in, and It was time to start my journey down the Minecraft rabbit hole…
Helping Out
Padraignix had showed me the process of setting up a surprisingly beefy Minecraft server for Free using Oracle Cloud. I think what he was able to achieve with this is really impressive, particularly because the ATM modpack requires a server with a substantial amount of memory, much more than your average paid VPS. A VPS of this specification can run $100+ per month from Google Cloud or AWS (I checked). He has an excellent write up on the process over on his blog: https://blog.quantumlyconfused.com/trench-talk/2023/12/02/mc-cloud-infrastructure/.
I grabbed my free tier quota of Oracle Cloud VM, another Ampere host with 32gig of ram, not to run another gameserver, but to transfer my existing cloud apps from my Vultr VPS over to Oracle, saving $35 per month on running various discord community bots.
I’ve really enjoyed building bots and cogs in the discord.py framework over the past couple of years. When Padraignix had described to me the process of setting up a completely free and more than capable Minecraft server, (which he has documented in detail here) I thought why not use my skills to bridge the gap between Discord and the Minecraft server?
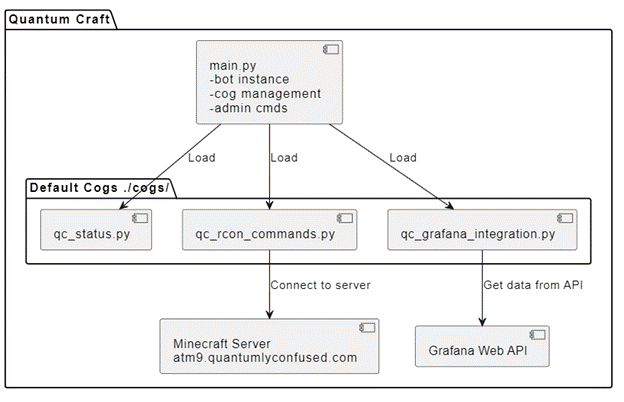
My write up to follow details the approach to building a of a Minecraft Server integration bot for discord with additional features for server monitoring in Grafana. The complete project, at least as far as the steps described here are available on github https://github.com/Quantumly-Confused/discord-integration if you’d like to check it out or contribute.
Quantum Craft - Minecraft Server Control and Grafana Integration for Discord
Bot Requirements:
-
Send server commands from Discord
-
Monitor the gameserver by integrating Grafana dashboards and panels with discord
-
Should be modular, and configurable for any Grafana or server installation
-
Commands should follow a modular design principle and be able to be loaded to a number of discord bots as a cog/extension
Creating the Bot in Discord.py
discord.py is a modern, easy to use, feature-rich, and async ready API wrapper for Discord that I continue to use for creating Discord bots. Discord.py is almost as old as Discord itself, having been launched in 2015. The library was developed by Rapptz (Danny) who dropped the project after Discord made substantial changes to its interactions and slash commands framework. It’s a long story, but the good news is that Discord.py has resumed development, and I’d rather not have to learn an entirely new library for interacting with the Discord API.
The documentation for the Discord.py library is available here: https://discordpy.readthedocs.io/en/stable/
First Steps
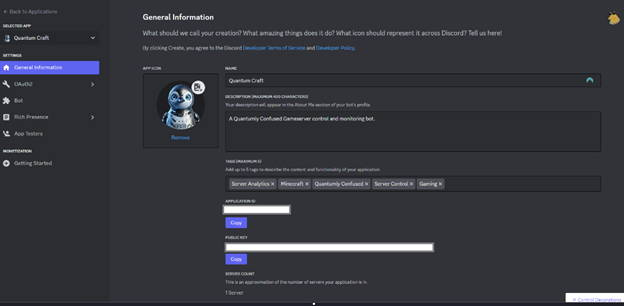
Bots are created as Discord applications via the Development Portal. Open https://discord.com/developers/applications/ and click on “New Application”.
Name it as you want and give it an App icon (this will be the default avatar image of the Bot). Then on the left side, click on “Bot” and then on the right, click “Add Bot”.
The first thing we need to do is grant the application the scope it requires while interacting with the discord API, in Discord these are described as intents.
Before installing any modules it’s a good idea to create a new virtual environment for this project.

Required Modules
For our module which is running the actual bot instance, we will require the discord.py module. This can be installed with pip – pip install discord. Aside from discord.py we will mostly only need built in modules in our bot module. https://github.com/Quantumly-Confused/discord-integration/blob/main/requirements.txt
There are 3 modules which are required which are not included in python’s standard site-packages:
- DotEnv: we will use this to set environmental variables such as api token and connection strings. Pip install python-dotenv
- Asyncio: Python library used for writing concurrent code using the async/await syntax required by discord.py. This library is included by default in Python 3.4 and above.
- Logging: allows us to create a log handler for organization of our bot logs.
- Discord.app_commands: a newer addition to the Discord API which allows implementation of Slash Commands in Discord bots. These commands provide a more integrated and user-friendly way for users to interact with bots directly in the Discord client.
- Discord.commands: the more traditional commands package for Discord.py, allowing users to send a command to the discord API using a message prefix and text command. Standard commands support access to a context object that provides information about the message, channel, guild, and user who invoked the command.
- os: We will use os to load our environment variables in our code with
os.getenv - io: io is an extremely useful library when it comes to performing file I/O operations such as reading and writing from the disk. Initially, we will use this just for writing and reading our log files with
io.Bytesio.
I imported the traditional Discord commands package which is standard for any project, but I think Slash Commands are going to be very useful here, since they integrate with the discord UI to allow for auto complete suggestions, command completion and an overall more user friendly experience while interacting with the bot.
Setting Gateway Intents
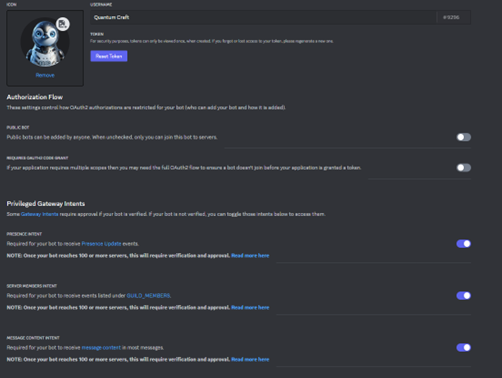
When starting a discord.py project, you need to manually set the intents that are required for the bot. If they are privileged intents, they will need to be enabled in the discord developer portal application panel first.
When planning intents it helps to think about what the bot will need in order to perform its tasks. In our case:
- Needs to be able to view and respond to user reactions and interactions in a discord channel. This is granted with Default intents.
- Needs to be able to read messages and interactions, this is required so that the bot will be able to interpret its commands directly from a discord message. This is granted with Message_Content intents.
- Needs to be able to receive events related to message editing, creation and deletion so that it is able to respond to interactions by editing its own messages. This is the messages intent.
- Finally, we will require the members intent, which grants the bot access to events such as a member joining a server/channel and allows the bot to take some action based on those events.
So let’s set our required intents:
The intents should be set at the start of our main bot file main.py. right under your imports. Here is our project so far:
1
2
3
4
5
6
7
8
9
10
11
12
13
14
import discord
from discord import app_commands, File
from dotenv import load_dotenv
import asyncio
import logging
from discord.ext import commands
import os
import io

intents = discord.Intents.default()
intents.message_content = True
intents.messages = True
intents.guilds = True
intents.members = True
Setting Privileged Intents
For privileged intents, its also necessary to toggle them for the bot application in the developer portal. Declaring them in the code will not work if they are not checked here also.
https://discord.com/developers/docs/topics/gateway#gateway-intents
Creating a Logger
Creating a logger is a best practice no matter what application we are developing, so I added my boilerplate logger definition here. Proper logging for Discord bots is especially useful when it comes to situations where several admin, moderators or support staff need to review the state of the bot without access to the terminal or file system of the server where the bot is running.
1
2
3
4
5
6
7
8
9
#* Logging setup for the bot
logger = logging.getLogger("quantumly_confused_bot_log")
logger.setLevel(logging.DEBUG)
handler = logging.FileHandler("quantumly_confused_bot.log", encoding="utf-8", mode="a")
print(f"Log file created at: {handler.baseFilename}")
handler.setFormatter(
    logging.Formatter("%(asctime)s:%(levelname)s:%(name)s: %(message)s")
)
logger.addHandler(handler)
- This line initializes a new logger instance with the name “quantumly_confused_bot_log”
- This sets the logging level of the logger to DEBUG. The levels dictate the severity of the messages the logger will handle. DEBUG is the lowest built-in severity level, so this logger will capture every log message (debug, info, warning, error, and critical).
- This initializes a FileHandler to write log messages to a file named “quantumly_confused_bot.log”. The file is opened in append mode (mode=”a”), meaning new log messages are added to the end of the file without overwriting existing content. The handler uses UTF-8 encoding for the log file.
- This configures the log message format for the file handler. The format includes:
- %(asctime)s: The time when the log record was created.
- %(levelname)s: The level of the log message (DEBUG, INFO, etc.).
- %(name)s: The name of the logger that created the log record.
- %(message)s: The actual log message.
- Finally, this line adds the configured file handler to the logger. This means that any log messages handled by this logger will be routed through this handler, which writes them to the specified log file we defined in step 3. This is my boilerplate logging handler I include in all python projects, and the formatting provides detailed context for each log message that is invaluable for debugging.
Setting Environment Variables
Given the primary functions I see the bot performing, I don’t anticipate the need for a database, at least initially. For our initial bot entry point and cogs, we won’t need any user data at all. We will need to store the Discord and Grafana API tokens, as well as the Grafana UID, Grafana custom domains and Grafana panel and rendering URLs so that this cog can be adapted to any Grafana account. Environment variables will be a convenient place to store these values.
We will add to the .env anything we don’t want to hardcode into the source. Install the python-dotenv package from Pypi.
Load our Env Variables, Define the Bot object and Name our Logger
1
2
3
load_dotenv()
bot = commands.Bot(command_prefix="/", intents=intents)
bot.logger = logger
Since we are planning to use discord slash commands, I created a discord.py Bot object with command_prefix=”/”. Any prefix can be used here, and for text commands it’s common to use “>”, “!” or “,”, but discord slash command features will bot be available if any prefix but “/” is assigned. Also we will need to pass our required intents which we already defined in the global namespace as one of our first setup steps. We can simply pass along our predefined intents with intents=intents.
We assign the logger attribute of the bot to the variable ‘logger’. Since bot is an instance of the commands.Bot class. Now we can easily access and use the logger within the bot’s methods or functions. For example:
1
2
3
4
5
6
7
class Bot:
    def do_thing():
        try:
            print("Doing the thing")
            logger.info("Did the thing")
        except Exception as e:
            logger.error("Couldn't do the thing")
Security Considerations – Command Invocation
At this stage, we can start to create some commands for the main bot, which we will define as a class or in discord terms, a ‘cog’. This can be confusing since now we have a cog, or main cog loading cogs.. but in a discord context, main.py will act as an entry point for our Discord application, not as a cog. Although it appears as a module with a setup function which is the same as any cog, this will be where we set up and run the bot, handle top-level configurations, and orchestrate the loading of various components, including ‘proper’ cogs. This means that commands that we define in main.py should be focused on setting the bot configuration and subsequent initialization and orchestration of the bot. Essentially, administrative commands. This is why it’s important to do the groundwork and just a little bit of planning so that we can easily
Now, I believe there is a built in decorator to achieve something similar in discord.py, but I like being able to define a command predicate with specific server role checks so that we can apply granular permissions to individual commands.
Let’s call this function is_mod_or_admin, and since it is a check condition, we don’t need to make it an asynchronous function and we don’t need to supply any parameters.
Inside the check of is_mod_or_admin, we can define a condition to be checked , which we call predicate(). This function can by asynchronous, since it will be sending multiple requests to discord to retrieve the configured server roles. You will notice that we are including an argument this time, ctx or context.
In the context of a Discord bot, ctx usually contains information about the command that was invoked, such as the message, the author of the message, and the server (guild) where the command was invoked. This is the data we need to make a necessary determination with our is_mod_or_admin check – in the context of the message, we are able to determine ctx.author as the initiator of the command.
For our predicate, lets define three roles to compare against: the role of mod, owner and admin, which we can get using a discord.py helper function called utils. discord.utils.get(iterable, /, **attrs)
1
2
3
4
5
def is_mod_or_admin():
    async def predicate(ctx):
        mod_role = discord.utils.get(ctx.guild.roles, name="Moderation Team")
        owner_role = discord.utils.get(ctx.guild.roles, name="Owner")
        admin_role = discord.utils.get(ctx.guild.roles, name="Admin")
Now let’s add logic that we can apply as our check, to see if the author of the message, ctx.author in the context of a discord command, has one of the roles which we defined from ctx.guild.roles.
1
2
3
4
5
6
7
def is_mod_or_admin():
    async def predicate(ctx):
        mod_role = discord.utils.get(ctx.guild.roles, name="Moderation Team")
        owner_role = discord.utils.get(ctx.guild.roles, name="Owner")
        admin_role = discord.utils.get(ctx.guild.roles, name="Admin")
        return mod_role in ctx.author.roles or admin_role in ctx.author.roles or owner_role in ctx.author.roles
    return commands.check(predicate)
We can return this to a built in discord.py decorator @discord.app_commands.check which when invoked, accepts a single predicate as a check to return a True or False value. Failure will return a CheckFailure Exception, and we can make sure that in this case the commands are not executed and we can send the appropriate response to the person who invoked the command. If True, we can interpret the check as confirming that the person who invoked the command is mod, admin or server owner.
Now that we have our function to check if a user has the correct role, we can re-use this decorator with any or our commands or slash commands to come.
Creating our Primary Bot instance
Since we want our main.py to act as the bot entry point we will need to define it as an object and create an instance of that object to pass to each of our cogs. I called the main bot object QCAdmin, and just like a regular Python class, we can grant QCAdmin attributes which will be inherited when an instance of the class is created. We define the attributes to be initialized with the new class instance: def __init__(self, bot), self referring to the class attributes of QCAdmin and bot, which we can supply as the variable we created for the Bot object already.
1
2
3
4
class QCAdmin(commands.Cog):
    def __init__(self, bot):
        """ Initializes the QCAdmin class, which contains admin commands for the bot and cog management commands."""
        self.bot = bot
Since QCAdmin will act as the bot itself, we set the bot object as an attribute of QCAdmin with self.bot = bot.
Now, when we create an instance of QCAdmin, the bot object is included with it. Here’s an example by just entering our code so far in Python and instantiating a new instance of QCAdmin.
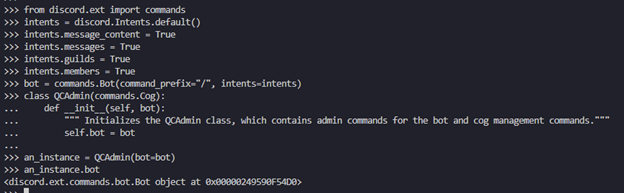
Perfect, in this example we created a new instance of QCAdmin named an_instance, and demonstrated that the bot object was inherited as one of its attributes.
Logging into Discord as the bot
Now that we have our main bot class defined, let’s run the bot, and add our QCAdmin class as it’s first cog. This code should be added to the very end of our main.py file and should not be indented.
1
2
3
4
5
6
7
async def main():
    """ Main function for the bot."""
    await bot.add_cog(QCAdmin(bot))
    await bot.start(os.getenv('DISCORD_API_TOKEN'))

if __name__ == '__main__':
    asyncio.run(main())
There are a couple of things to unpack here, but essentially this code will act as an entry point of a script that runs a Discord bot which we call ‘main()’. To make sure main() is launched as a coroutine, we use asyncio.run() function to run it.
Here’s a breakdown of the code:
if __name__ == '__main__':This line checks if the script is being run directly.- In Python,
__name__is a special variable that is set to the name of the module if it’s imported, or'__main__'if the script is run directly. - This check is used to prevent the code from running if the script is imported as a module.
- In Python,
asyncio.run(main()): This line runs themain()coroutine using theasyncio.run()function. *asyncio.run()is a convenience function that creates an event loop, runs a coroutine, and closes the loop.
Inside our main() coroutine:
-
await bot.add_cog(QCAdmin(bot)): This line adds QCAdmin as a “cog” to the bot. This includes all attributes and methods of the QCAdmin class. -
await bot.start(os.getenv('DISCORD_API_TOKEN')): This line starts the bot and the API token needs to be supplied.os.getenv('DISCORD_API_TOKEN')retrieves the bot’s API token from the environment variables.- The API token is used to authenticate the bot with the Discord API.
If you run this code, you will just see a blinking cursor in command line, this is a good thing. We are now connected to the discord API but the bot has no additional tasks and is waiting for an event to occur. I like having some feedback once we connect providing us with some basic information about the environment. The best way to do this is to use the @bot.event decorator, which can be used to register an event which will occur when the bot successfully authenticates to the discord API. The event itself is a function named on_ready() which will print some basic information about the API connection, bot and loaded extensions.
1
2
3
4
5
6
7
8
9
10
11
12
13
14
15
@bot.event
async def on_ready():
    print(f"Logged in as {bot.user.name}")
    print(f"Discord.py API version: {discord.__version__}")
    print(f"Bot ID: {bot.user.id}")
    print(f"Bot has loaded extensions: {bot.extensions}")
    print("------")
    logger.info(f"Logged in as {bot.user.name} Discord.py API version: {discord.__version__} Bot ID: {bot.user.id}")
    print(f"{bot} has connected to Discord.")
    logger.info(f"{bot} has connected to Discord.")
    try:
        synced = await bot.tree.sync()
        print(f"Synced {synced} commands")
    except Exception as e:
        print(e)
The bot should have our QCAdmin extension loaded, and we can now add our first commands.
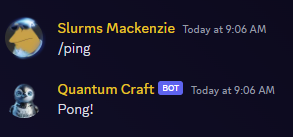
Testing our Bot with /ping
To make sure everything is working as expected, I created a test command which will simply return a message in the same channel where the command was executed.
1
2
3
4
5
6
7
8
class QCAdmin(commands.Cog):
    def __init__(self, bot):
        """ Initializes the QCAdmin class, which contains admin commands for the bot and cog management commands."""
        self.bot = bot
    @commands.command(name="ping", description="Pings the bot.")
    async def ping(self, ctx):
        """ Pings the bot."""
        await ctx.send("Pong!")
Now after we run the bot again by launching main.py, we should see our on_ready() function information, and we can test our command in any channel where the bot is able to access.
Perfect! Let’s write some real commands, but first let’s do a little more planning.
Creating a Slash Commands Group
Rather creating a bunch of commands with no structure, it helps to group commands by their command type, and then include the same type of commands as subcommands. Let’s take some commands as an example which we think we will need.
- Get the bot log
- Clear the bot log
- Load a cog
- Unload a cog
- Get loaded cogs
- Reload a cog
Without grouping we could just name the commands to keep them as self explanatory as possible:
- /getlog
- /clearlog
- /coginformation
- /loadcog
- /unloadcog
- /showcogs
- /reloadcog
Now if we categorize and group the commands, logically they should look like this:
- /admin log
- /admin log clear
- /cog info
- /cog load
- /cog unload
- /cog list
- /cog reload
Much better! We have two command groups, admin and cog, which will serve us well for organizing the basic entry point commands and is especially useful when it comes to slash commands. More on that later, for now, lets make our command groups.
1
2
admin = app_commands.Group(name="admin", description="Admin commands for the bot.")
cog = app_commands.Group(name="cog", description="Manage Bot Cogs.")
In Discord terminology app_commands are the same as ‘slash commands’, meaning that it is a command that integrates with the discord UI. Once the group is created, we can create commands for the group by simply adding a @group decorator to the command definition. To create a command in the admin group, we can create a new slash command with @admin.command followed by the command code. The command decorator has two useful arguments, name and description, which will be useful for users navigating the commands groups in the discord UI. Now we get to use the log handler or ‘logger’ as we defined earlier, as well as our @is_mod_or_admin() decorator.
1
2
3
4
5
6
7
8
9
10
11
12
13
14
15
16
17
18
19
20
21
22
23
24
25
26
27
28
29
30
31
32
33
34
35
36
37
38
39
@admin.command(name="log", description="Gets or clears the bot's log file. Use 'get' or 'clear'.")
@is_mod_or_admin()
async def qc_log(Interaction: discord.Interaction, action: str = "get"):
    log_file_path = "quantumly_confused_bot.log"
    if action == "get":
        try:
            with open(log_file_path, "rb") as log_file:
                log_content = log_file.read()
                log_bytes = io.BytesIO(log_content)
                log_attachment = File(fp=log_bytes, filename="quantumly_confused_bot.log")
                await Interaction.response.send_message(file=log_attachment)
                logger.info(f"The log file was retrieved by {Interaction.user}.")
        except FileNotFoundError:
            await Interaction.response.send_message(
                "The log file could not be found.", ephemeral=True
            )
            logger.info("The log file could not be found.")

    elif action == "clear":
        try:
            open(log_file_path, "w").close()
            await Interaction.response.send_message(
                f"The log file has been cleared by {Interaction.user}.", ephemeral=True
            )
            logger.info(f"The log file has been cleared by {Interaction.user}.")
        except Exception as e:
            await Interaction.response.send_message(
                f"An error occurred: {str(e)}", ephemeral=True
            )
            logger.error(
                f"An error occurred while trying to clear the log file: {str(e)}"
            )
    else:
        await Interaction.response.send_message(
            "Invalid action. Use 'get' or 'clear'.", ephemeral=True
        )
        logger.warning(
            f"Invalid action entered by {Interaction.user} for /admin log command."
        )
To test the logger I added an information message to the ping command.
1
2
3
4
5
@commands.command(name="ping", description="Pings the bot.")
async def ping(self, ctx):
    """ Pings the bot."""
    await ctx.send("Pong!")
    await logger.info(f"{ctx.author} pinged the bot.")
Now to test our admin log commands in discord while the bot is running.
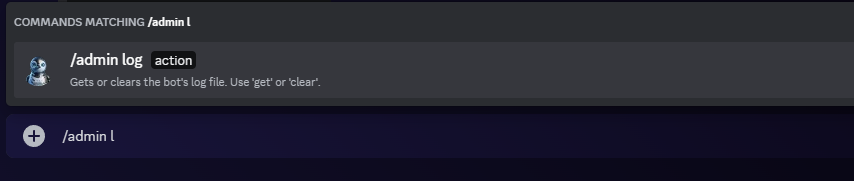
Already slash commands demonstrate their value, as I was typing in /admin log it autopopulated the command along with the required parameters, which are the actions ‘get’ or ‘clear’. Let’s try and get the log after sending another ping command.
Beautiful, let’s create another useful command for the admin group – a command sync.
Keeping Commands in Sync
Slash commands can be a bit of a pain while actively developing a bot since they need to register with the server to become visible in the discord UI and available for use. Generally, Discord will sync it’s slash commands with the bot when the bot is restarted, which we don’t want – since we want to be able to develop cogs while the main bot continues to run. It would serve us well, with the objective of creating a modular discord bot, to bake into the code methods to synchronize our commands with Discord.
1
2
3
4
5
6
7
8
9
10
11
12
13
@admin.command(name="sync", description="Syncs the bot's commands with Discord.")
@is_mod_or_admin()
async def sync_commands(self, Interaction: discord.Interaction):
    """ Syncs the bot's commands with Discord."""
    await Interaction.response.defer()
    try:
        logger.info(f"Command sync initiated by {Interaction.user}...")
        synced = await self.bot.tree.sync()
        await Interaction.followup.send(f"Commands synced successfully! Synced {len(synced)} commands.")
        logger.info(f"Synced {len(synced)} commands")
    except Exception as e:
        logger.error(f"Sync Failed. An error occurred: {e}")
        await Interaction.followup.send(f"Sync Failed. An error occurred: {e}")
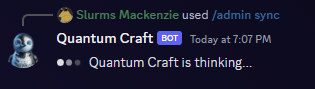
Same as before, let’s add the command to the admin group and restrict it for mods or admins, then we can get to the actual command code. First, as with many interactions, we need to defer the response with Interaction.response.defer(). Interactions by default expect a response object within 3 seconds of the interaction being sent. In many cases, where processing is required or the interaction may be calling other modules or APIs the response will exceed 3 seconds and Discord will lose track of the interaction.
Defer tells Discord to expect the response later, so as long as we do, we are good! If we end up opening a bunch of deferred interactions and don’t send those followups, we may run into the implication of rate limits to the Discord API.
After we have deferred the response, we can sync the bot command tree with self.bot.tree.sync(), and lets also add follow-up message with the number of synced commands. If an exception occurs, it logs the error and sends a follow-up message with the error message.
We can actually observe the defer method in real time when the bot is thinking…
It is probably a good idea to add an automated sync to our on_ready() code block to ensure that we are syncing commands every time the bot restarts, so here’s what the completed section looks like.
1
2
3
4
5
6
7
8
9
10
11
12
13
14
15
@bot.event
async def on_ready():
    print(f"Logged in as {bot.user.name}")
    print(f"Discord.py API version: {discord.__version__}")
    print(f"Bot ID: {bot.user.id}")
    print(f"Bot has loaded extensions: {bot.extensions}")
    print("------")
    logger.info(f"Logged in as {bot.user.name} Discord.py API version: {discord.__version__} Bot ID: {bot.user.id}")
    print(f"{bot} has connected to Discord.")
    logger.info(f"{bot} has connected to Discord.")
    try:
        synced = await bot.tree.sync()
        print(f"Synced {synced} commands")
    except Exception as e:
        print(e)
How to Modular: Let’s Manage some Cogs
Now that we have our bot running in main.py and loading our single management cog, QCAdmin, let’s build some methods to manage the cogs we will make later and the commands for a mod or admin to use those methods in Discord.
We will add these cog management methods to the cog command group we created earlier.
1
2
3
4
5
6
7
8
9
10
11
12
13
14
    cog = app_commands.Group(name="cog", description="Manage Bot Cogs.")
    @cog.command(name="load", description="Loads a cog.")
    @is_mod_or_admin()
    async def load_cog(self, Interaction: discord.Interaction, cog_name: str):
        """ Loads a cog."""
        await Interaction.response.defer()
        try:
            extension = f"cogs.{cog_name}"
            await bot.load_extension(extension)
            logger.info(f"{ctx.author} Loaded {extension}")
            await Interaction.followup.send(f"Loaded {extension}")
        except Exception as e:
            logger.error(f"{ctx.author}: Load Extension - Failed to load {cog_name}: {e}")
            await Interaction.followup.send(f"Failed to load {cog_name}")
I made this cog loader based on some generally accepted standards when it comes to where cogs are located and how they are named. Our cogs should be placed in a ‘cogs’ subfolder of the main bot directory, and the cog name will be the same name as the module defined in the cogs setup function. Notice I’m deferring the response again – we can’t be sure how long a cog will take to load so we need to account for the loading process to exceed 3 seconds. We can use the Bot.load_extension method from discord.py to load our cog. I also added our handy check that we created earlier by adding the @is_mod_or_admin() decorator before the main command definition.
Every loader needs an unloader, so I will work on that next. The only difference here is that I am calling the Bot.unload_extension method.
1
2
3
4
5
6
7
8
9
10
11
12
13
14
15
16
@cog.command(name="unload", description="Unloads a cog.")
@is_mod_or_admin()
async def unload_cog(self, Interaction: discord.Interaction, cog_name: str):
    """ Unloads a cog."""
    await Interaction.response.defer()
    try:
        extension = f"cogs.{cog_name}"
        await bot.unload_extension(extension)
        await Interaction.followup.send(f"Unloaded {extension}")
        logger.info(f'{Interaction.user} Unloaded {extension}')
    except Exception as e:
        print(f"Failed to unload {cog_name}")
        print(e)
        logger.error(f'{Interaction.user}: Unload Extension - Failed to unload {extension}: {e}')

        await Interaction.followup.send(f"Failed to unload {cog_name}")
We may as well use the other extension methods from discord.py, so I made a similar command again for reloading cogs with the Bot.reload_extension method.
1
2
3
4
5
6
7
8
9
10
11
12
13
14
@cog.command(name="reload", description="Reloads a cog.")
@is_mod_or_admin()
async def reload_cog(self, Interaction: discord.Interaction, cog_name: str):
    """ Reloads a cog."""
    await Interaction.response.defer()
    try:
        extension = f"cogs.{cog_name}"
        await bot.reload_extension(extension)
        logger.info(f"Reloaded {extension}")
        await Interaction.followup.send(f"Reloaded {extension}")
    except Exception as e:
        print(f"Failed to reload {cog_name}")
        logger.error(f"{Interaction.user} Failed to reload {cog_name}")
        await Interaction.followup.send(f"Failed to reload {cog_name}")
And to complete our cog management commands for now, it would be useful to list the cogs which are currently loaded into the main bot. To do this we can simply create a list from bot.extensions, assign it to a variable – loaded_extensions and return it as the Interaction response.
1
2
3
4
5
6
@cog.command(name="loaded", description="Shows currently loaded extensions.")
    async def show_loaded_extensions(self, Interaction: discord.Interaction):
        """ Shows currently loaded extensions."""
        loaded_extensions = list(bot.extensions)
        await Interaction.response.send_message(f"Currently loaded extensions: {loaded_extensions}")
        logger(f"Sent loaded extensions")
We don’t have any cogs to load yet, which we will move on to next, but keep in mind that the cog management functions we now have available for the bot will work for any discord cog! If we wanted to we could find a git repo containing a discord cog for a chess game and load it here, or a cog which tells us the weather – anything as long as it is a properly packaged cog and we add it to the .\cogs directory.